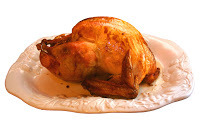
Many of you are preparing for Thanksgiving this evening. I have talked to a few people who were very nervous about the turkey roasting. If you are lacking a recipe, my standby recipe at my website is a popular one with many of my friends. I have some overall tips for delicious turkey, some that are part of the above recipe, but others that I have learned in the past few years that have perfected my turkey.
Organic IS worth the money:
We tried a fresh, organic turkey last year and all my guests said it was the best turkey they ever had. We got ours from Whole Foods, and the brand was “Plainville Farms” (https://www.plainvillefarms.com/). The turkey had a lot better flavor and texture than the frozen conventional ones in our past. If you can afford it, give it a try!
If you have to get one really huge turkey, do two smaller ones instead:
Generally speaking, the really big turkeys are older and tougher-and they need to cook longer. If you are really feeding a crowd, I suggest you get two smaller 12-15 lb. turkeys. They will be more tender, easier to manage and quicker to cook.
Cook your bird upside down for half the cooking time:
This is in my recipe, but I wish to reiterate it. Cooking the turkey this way allows the juice and drippings to fall toward the breast for most of the cooking time. It also forces the breasts to cook very slow at the bottom versus browning very fast on the top. You will need some help flipping the bird over-so enlist a strong guest or family member. Once flipped right side up, baste nicely and finish cooking. If the top starts browning too fast, tent with foil and continue basting.
If you have the time, brining does wonders:
Last year was the first year we brined the turkey, and it really was worth the extra effort. We used Williams Sonoma brining bags and their special brining mix. If you do a little research, some people swear by soaking the turkey in a brining solution in a large plastic bin or bucket. The issue is keeping the turkey cold that way. The bags allow us to keep the birds in the fridge, lying flat. Be sure to rinse the turkeys thoroughly after brining is done, otherwise you may have very salty turkeys (salt is the key to brining). If you wish to make a brining solution from scratch, Alton Brown rocks and here is his recipe: (https://www.foodnetwork.com/recipes/alton-brown/good-eats-roast-turkey-recipe/index.html)
Don’t forget to get your fingers UNDER the skin with all your shortening and seasonings when prepping:
This is important to not only keep things moist under the skin while cooking, but also to infuse the meat with your flavors versus just seasoning the skin. You will get a better turkey by getting your hands dirty! Don’t be shy!
Don’t stuff the turkey unless it’s to flavor the turkey:
Stuffing can be served separately. Stuffing needs to be cooked to a different temperature than the turkey, so actually cooking them together at the same time doesn’t make a whole lot of sense. Also, stuffing the turkey slows the cooking of the turkey, so its just better to keep the stuffing in it’s own pan. You can stuff the turkey with some whole fruits or whole vegetables loosely that keep the turkey moist while cooking. My recipe above includes putting quartered apples, oranges and onions in the cavity. The moisture from the fruits keep the turkey very moist.
Hope these tips help, and please have a wonderful and safe holiday! And as we all give thanks, I would like to thank you for visiting and being a reader!
- Sugar-Free, Low-Carb, Olive Oil Chocolate Hazelnut Tart - February 18, 2023
- Easy Slow Cooker French Onion Soup - November 28, 2022
- Recipe: Chicken Vindaloo with Whole Foods Vindaloo Curry Powder - January 22, 2022


