I finally won first place in our parish’s fall festival apple pie contest! Maybe the third time was the charm? Maybe I finally baked the right combo of apples the right way to get the right softness? Either way, I played with three recipes all month ( I will post the other contender later this week) and this one rose to the top, and it won our parish fall festival’s apple pie contest this weekend! I am still on cloud nine!
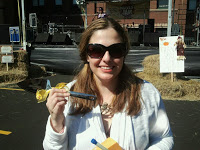 |
| Here is me being a proud dork with my silver engraved pie server trophy. Yeah. So? You get up at 5 a.m. and bake 2 pies with ornate leaf tops with no coffee in sight. |
I did not want to do anything typical. And as I was brainstorming, I was inspired by a stuffing I made one year for turkey…of all things. The stuffing had apples, sage and raisins. The sage with the apples were a great combo. So I thought, why not for pie? Instead of raisins, I decided on getting that earthy sweetness from maple syrup. Then, I wanted a sweet yet earthy crust to carry the apples. I found my inspiration for that in Rose Beranbaunm’s Pie and Pastry Bible. Her cream cheese crust is a stalwart workhorse for her…and my…pies. But nestled under “variations” for this crust in her book was a note mentioning substituting Mascarpone for the cream cheese. Oh, baby! That was the ticket. When I tested it at work, people commented that the crust was, “magical”, “memorable”, even “haunting” with the addition of maple extract. That’s when I knew I had my entry.

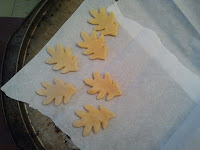
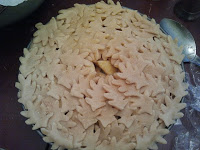
You will see here, I was going for presentation points with the full leaf top. You can keep yours simple. My tip to you if you wish to make this ornate top is to precut the leaves the night before, and separate layers with plastic wrap or parchment paper as you lay them on top of each other on a baking sheet. Wrap them tightly in the fridge and they will be ready the next day. The wait time helps the gluten relax, too, because the dough gets reworked and rerolled when cutting all the leaves and you want the dough to be tender. Sitting in the fridge does wonders here.
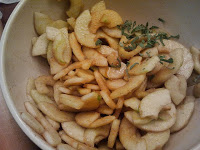
This pie has great fall flavors and is pretty unique. It would be great for Thanksgiving. I used the sage from my garden and apples that were in season. A couple of things to note about the apples, I used a mix for the filling. I went for tender, tart-yet-sweet apple that holds its shape while still baking up soft (being the GALA apple), and mixed in a little GOLDEN DELICIOUS for sauciness and juice, and a new apple on the scene called a ZESTAR for some firmer texture (but not as firm as a Granny Smith) with a spicy tartness to kick things up a little. The ratios were 70% Gala (Northern Spy, Ida Reds or Pippins are good replacements), 15% Golden Delicious (Macs or Johnathans would work as a replacement), and 15% Zestar (Pink Lady or Honeycrisp could work here). I conducted an apple experiment last year and I do need to add to my findings with galas and some newer apples. The link is here if you want to know more.
My 1st Place Apple Pie: Brown-Butter Sage and Maple Apple Pie with Mascarpone Crust
Crust
12 Tbsp. butter, cold and cut up
2 cups plus 3 Tbsp. flour
1/4 tsp. baking powder
4.5 oz. Mascarpone cheese, chilled
3/4 tsp. maple extract mixed with 2 tsp. chilled water
1-2 more tsp. chilled water
1 Tbsp. sugar
Filling
8 lbs. apples, about 6-8 cups, peeled and sliced to 1/4 ” thick (about 5 galas, 1 1/2 or so golden delicious and 1 1/2 or so Zestar apple)
2 Tbsp. butter (for sauteing apples)
1/4 cup brown sugar
1/4 cup plus 1/8 cup real maple syrup
1/4 tsp. cinnamon
1/4 tsp. nutmeg
1/4 tsp. salt
splash of vanilla
6 Tbsp. butter (for the brown butter)
12-15 small to medium tender sage leaves (I avoid the big ones, they are too tough and punchy)
1 Tbsp. plus 1 tsp. cornstarch
Topping:
1 egg yolk
1 Tbsp. water
sugar in the raw for sprinkling
Directions:
Make the crust:
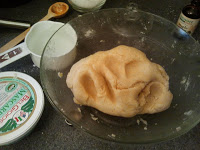
I have recently decided I like making my crusts by hand. It actually is less work, and you don’t overwork the dough, making the crust more tender! Seriously. Food processors are a pain to clean and put back. All you need is a pastry cutter (or even a fork!) a bowl and some elbow grease. Pour your flour, sugar, and baking powder in a bowl. Whisk with a fork, and cut in the 12 Tbsp. butter with a pastry cutter until you have the texture of small peas. Add the mascarpone in a few clumps and cut that in until you have the texture of coarse cornmeal. Premix the maple extract with the water, then drizzle it over the flour. You will not need much for things to start coming together, mascarpone has a lot of moisture. Add the 1-2 more teaspoons and continue to bring together with a pastry cutter or your hands at this point. Using saran wrap, quickly wrap two balls of dough, evenly divided, and flatten into round discs. Let chill for 30 minutes or overnight. If premaking cut out shapes, pull out the top crust dough ten minutes before rolling and roll between plastic wrap lightly dusted with flour until 1/8 inch thick. Cut out your shapes, layering them on a parchment-lined baking sheet. Take the scraps and reroll flat again, and continue cutting. Keep going until the dough is all gone, and layering leaves on layers of parchment in tiers. Cover tightly and refrigerate for at least an hour, or overnight. Roll out your bottom crust as well between saran wrap until it fits your pie pan with 1/2 inch overhang. Peel off the top saran wrap, and with your hand slid under the bottom of the dough flip it into your pie dish and peel off the bottom saran wrap (which will then be at the top) as you adjust the position of the dough. Press into the pie dish, trim so the overhang is 1/2 thick on all sides (patching as you need). Wrap the pan in saran wrap tightly and let rest for one hour or overnight as well. Resting lets the gluten relax and prevent shrinking and toughness.
If this is done overnight, you are ready to be a rock’n baker the next day. A lot of work is done!
Filling:
Core and slice your apples. (I was given an apple peeler/corer one year and it is the best gadget I have ever had. If you make a lot of apple pies, I highly recommend this gadget. Makes quick work of peeling and coring apples, and they are the most perfect, even slices you could ever have.) Toss the apples with the sugar, maple syrup, brown sugar, cinnamon, nutmeg, salt, vanilla. Let macerate for 1-2 hours.
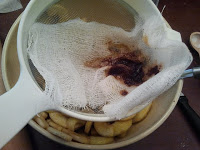
While that is sitting, I make my brown butter. Take 6-8 sage leaves (if I have some baby leaves, I make 2 counts for 1) and rinse them lightly and cut them into a chiffonade. Add them to the 6 Tbsp. butter in a small saucepan with a light-colored bottom. Melt the butter and simmer it until all the foam disappears and the butter becomes a nice amber brown. Brown solids will float to the bottom of the pan. Don’t worry. Take the brown butter off the heat and let sit for 5 minutes. Strain the butter through a fine wire sieve lined with cheesecloth into a small bowl. Set aside.
Drain the apples in a colander, reserving the juice. Depending on your apples you may have 1-2 cups of juice or just over 1/2 cup. Pour the reserved juices into a small saucepan and cook it until it is thick and caramelized, reduced to about 1/3 of a cup. Set aside as well.
Meanwhile, in a large saute pan, melt the 2 Tbsp. butter over medium-high heat. Add the drained apples and saute for 10 minutes until just softened. This just gets things going and ensures no tough apples in the pie. Return the apples to the macerating bowl. Into the apples, add the cornstarch. Take the remaining 6-8 sage leaves, and cut them into a chiffonade, and add them to the apples. Toss lightly. Add the reduced juices and the brown butter, and toss.
Assembly and Baking:
Preheat oven to 425˚ with a rack at the lowest part of your oven and a parchment-lined baking sheet on it. Heat the baking sheet for at least 20 minutes before putting your pie in.
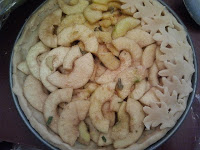
Take out your dough. Fill the bottom crust with the apples. You can mound them if you are doing a simple crust. If you are doing a leaf crust, less of a mound will be easier to work with. Start from the outer edge and place leaves from the stem on the outer bottom crust and the tips pointing inward. Overlap a little as you go around. Now do the next inner circle, overlapping, and finally the innermost circle. With the overhang, fold over and onto the leaf stems, crimping with your fingers, making a seam. I usually have extra leaves at this point, and I place them on the edge right on top of the crust edging following parallel the circle of the pie.
Whisk the yolk and water and brush over the top of the leaves gently. Sprinkle with the raw sugar. Place the pie directly on the baking sheet and bake for about 30 minutes. Then cover the edges with tinfoil or a pie shield. After 10-15 minutes, check on it again. If the crust is getting brown but you are not seeing thick bubbling from the apples, tent the pie completely with tinfoil and a steam hole for 10 minutes until the apples catch up. The pie should take about 50 minutes or so, depending on your oven. Let sit and cool for at least a couple hours before cutting into it.
PS: In full transparency, the pictures shown were my test pie, not the contest winner. The yolk glaze, right apple mixture, and precooking the apples I did for the winning pie. So the pictures are not completely true to crust color & texture and apple colors and textures.
Flora is an award-winning creative director in Chicago turned food and lifestyle blogger extraordinaire. She is also author to the popular BEE NATIVE! gardening book series and various children's books that celebrate the wonder and hard work of bees and butterflies. Her blog and social spaces inspire thousands to create, learn, cook, grow, and craft, making their world lovelier one pixel/petal/seed/bite/stitch/brushstroke at a time. Follow her on all the social spaces, YouTube, and Amazon, and get creative!
Latest posts by Flora Caputo
(see all)