I finally closed out my holiday baking, and tins and boxes are slowly making their ways to clients, colleagues, and loved ones. This part is the best part of baking showering people I care about with my handmade cookies. I think it really encapsulates the spirit of the season for me.
And to see the joy and excitement on people’s faces because of my hard work and love is SO SPECIAL.
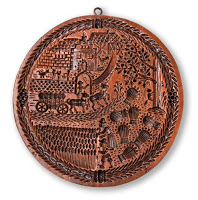
Well, nothing says labor of love more than springerle cookies. For those of you that don’t know, this cookie traditionally takes 3 days. You may have seen master bakers tackle this, using extraordinary molds with details that boggle the mind. Like, look at this craziness made by House On The Hill:

THIS!

and this!
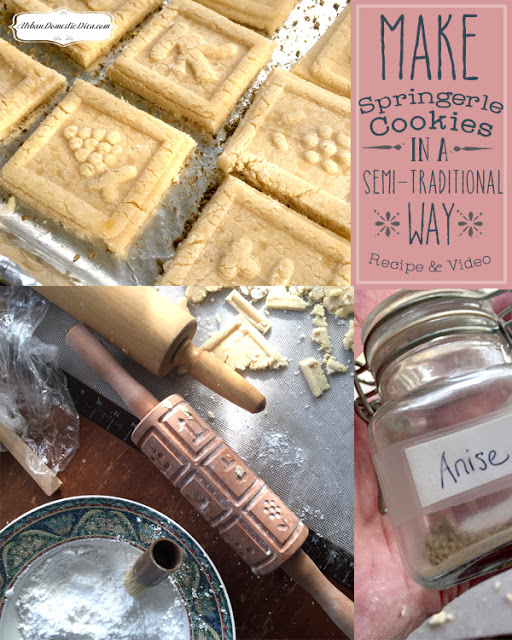
Some of these molds are handed down from generation to generation. If you really want to get good at this cookie and do extravagant molds, here is a great place to buy them, and they share another version of this recipe they feature on youtube using the traditional hartshorn baking powder. Their recipe intrigued me, but it uses butter and anise oil. As you will see in my video, I wanted to try older recipes from these old antique cookbooks I found, and both those recipes do not use butter. They also use the sprinkling of anise seed method on the baking sheets. When I did research on Wikipedia, this was the way they have traditionally been made in the dark ages. So I wanted to try that first.
The video below takes you through my adventure. The result was very good! I do want to try hartshorn next time because supposedly the cookies rise higher and create a better texture. Evidently, it is hard to find, but heck. I’ll try Amazon and redo this next year for a comparison.
Springerle Cookies the Semi-Traditional Way
Ingredients:
4 cups of sifted all-purpose flour
1 teaspoon of baking powder
1/2 a teaspoon of salt
4 eggs set out to warm to room temperature
drop of vanilla extract
2 cups granulated sugar
2 teaspoons of grated lemon zest
2 tablespoons of crushed anise seed
confectioners’ sugar for rolling
2 tablespoons of butter
Directions:
Sift flour with baking powder and salt twice in a bowl and set aside.
In a large bowl with a stand mixer at high-speed beat the eggs until thick and light yellow in color, about five minutes. Then at medium speed beat in the granulated sugar 3 tablespoons at a time, beating well after each addition. This will take about 10 minutes and the mixture will get shiny and thick. Occasionally clean the side of the bowl with a spatula to make sure that the sugar is getting incorporated.
Next, add the lemon zest and the drop of vanilla and whip well. Now change the whisk to a paddle and gradually add the flour mixture on low. If the last of the flour mixture doesn’t incorporate well use a wooden spoon or incorporate by hand. The dough will be stiff and sticky.
Transfer the dough to a floured work surface and knead lightly. Divide into three sections, and shape them into a rough rectangle, about 4 x 6 or 5 x 7, flat. Wrap in plastic wrap and chill overnight. Also, chill your forms and molded rolling pin.
Wrap two large baking sheets with tinfoil and rub the 2 tablespoons of butter evenly on each. Next, crush the anise seeds (1 tablespoon per baking sheet) and sprinkle evenly right on the butter. Set the baking sheets aside.
Take your first chilled dough rectangle and place it on your work surface that’s been sprinkled with confectioners’ sugar. Sprinkle the top with confectioners’ sugar and with a flat rolling pin, roll it to roughly 5″ x 7″ but check your molded rolling pin and make sure that it is the right length and width to fit your springerle rolling pin. If you are using forms, size doesn’t matter but make sure the thickness of the dough is right for the molds to get the right impression.
With a pastry brush, dust the springerle rolling pin (or molds) with confectioners’ sugar. Starting at the end take the edge of your rolling pin and press down. As you roll it up, put heavy pressure on the rolling pin so that the form gets molded into the dough and roll all the way up and then release the rolling pin. Use a sharp knife and cut along the borders and set each cookie directly on the anise seeds and butter on the baking sheets. Continue with all three dough pieces, gathering remnants or broken imperfect pieces in a clump as you go. Gather all your remnant dough and reshape it with a little bit of water on your fingers into a rectangle to get the last batch of cookies rolled out. If the dough becomes too sticky from adding water use flour underneath the dough and on top to make sure that this last piece of dough made from other remnants come together and is workable, but not too sticky that it sticks to your molding rolling pin.
Once you have all the dough made into cookies, you’re going to let these cookies set overnight uncovered in a quiet, dry place.
The next day, heat your oven to 300˚ and bake cookies until just lightly golden on the edges. Flip the trays after 10 minutes for even baking. Bake for about 20-23 minutes then pull them out and let them cool on the trays. Store cookies in a tin with wax paper dividing layers. They’re good for 2 to 3 weeks. In fact, they get better with age! For more specific directions check out my YouTube video below!
Latest posts by Flora Caputo (see all)
- Sugar-Free, Low-Carb, Olive Oil Chocolate Hazelnut Tart - February 18, 2023
- Easy Slow Cooker French Onion Soup - November 28, 2022
- Recipe: Chicken Vindaloo with Whole Foods Vindaloo Curry Powder - January 22, 2022


